This is an old revision of the document!
Table of Contents

(remove this paragraph once the translation is finished)
Software tools for MLAB kit development
This site deals with software tools necessary for MLAB kit development and design, for information about technical equipment see manuals.
MLAB design and development is not restricted to one specific set of tools because different users have different demands of and approaches towards different types of sotware.
Electronic CADs
Tools for PCB design and schematics drawing, eventually also for simulation of connection. At the present time, we prefer KiCAD software, other tools are mentioned because they are still used to create some designs.
KiCAD
KiCad software suite is one of only three OpenSource tools for electronic design automation (EDA) of electronic circuits.
Ubuntu installation
There are two options for KiCAD installation in linux - usually it is advised to use the PPA.
PPA Repository
PPA is a system of remote access to an already prepared software packages. They usually contain a more actual version than the packages available from the standard system repositories.
In order to download and install the most stable KiCAD version, enter following commands into a terminal:
sudo add-apt-repository --yes ppa:js-reynaud/ppa-kicad
sudo apt-get update
sudo apt-get install kicad
Further settings
In its default setting, Ubuntu has disabled contextual icons - therefore the installed KiCAD does not contain any menu icons simplifying the design process. The problem can be solved by typing a following commands:
gsettings set org.gnome.desktop.interface menus-have-icons true
gsettings set org.gnome.desktop.interface buttons-have-icons true
UBUNTU_MENUPROXY= kicad # or pcbnew, eeschema and etc.
Windows Installation
The KiCAD installation is nowadays much simpler - it is only necessary to download an exe file and install it.
Settings
Libraries
- Standard libraries included directly in the programm KiCAD
- Libraries with components specific for MLAB, which also contain a script for their download from Github and offline work in KiCAD.
It is convenient to use as many parts of MLAB libraries (available at GitHubu) as possible when designing modules. MLAB libraries contain technologically optimised variants of general encasements, which is important especially during fitting and automatic generation of documentation.
Libraries are added to KiCAD separately during schematics drawing and separately during PCB designing - the procedure is very similar in both cases.
- Preferences → Manage Symbol Libraries → “Global Libraries” - Browse Libraries → Open Library
Schematics - components naming
During schematics drawing, it is necessary to stick to some convention so that the production and automatic generation of further documentation may occur without problems.
At the first start of Kicad Eeschema, you have to add the following fields describing components:
 MFPN
 Distributor
 Link
 Note
 UST_ID
In case that a schematic contains variants of fitted components, the MFPN (?? Identifikace pole) has an additional serial number, for example “MFPN_1”, “MFPN_2” etc. Components with the same serial number belong to the same variant and components without a serial number are common to all fitted variants.
When using a following procedure, it is no longer necessary to manually create all fields for every individual component.
V menu Preferences » General options » Field Name Templates
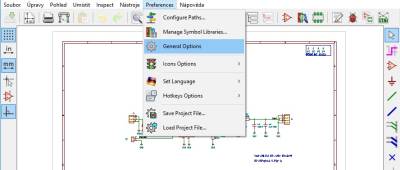
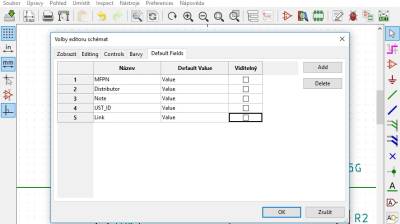
Opening the component’s parameters will show a following table:
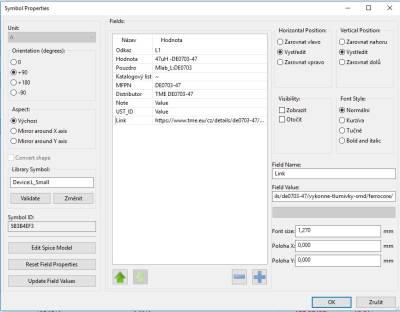
An example of filled in component’s parameters:
 Reference: C1
 Value: 10nF
 MFPN: 1812CA103JAT2A (an exact type of component, for fitting purposes)
 Distributor: Mouser 581-1812CA103JAT2A
 L{{ :cs:sw:sch_2.jpg?400 |}}ink: https://cz.mouser.com/ProductDetail/AVX/1812CA103JAT2A?qs=sGAEpiMZZMsh%252b1woXyUXjzY5digEXfcQu%252bp00y9d0Fc%3d
 Note: accuracy 20%, C0G
 UST_ID: if there is an entry in UST stock (?? pokud je přístup do UST skladu)
Rules for design
Before the beginning of PCB design, it is necessary to set up following rules. If you are not using circuits with small pitch of pins, following parameters are good to follow:
Layers
Layers settings differ according to the total number of layers on PCB.
Two layer PCB
- F.CU - upper copper layer (usually GND layer)
- B.CU - bottom layer (exclusively for SMD components)
- F.SilkS - upper silkscreen (this layer is fabricated)
- B.Silks - bottom silkscreen (layer is not routinely fabricated)
- Edge.Cuts - PCB final outline
- F.Fab - fabrication layer (??) strana součástek
- B.Fab - potisk pro osazování - strana spojů (??)
This layer arrangement is based on KiCAD layers documentation
Generating a list of components - BOM
Linux
- Press “set plugin cmd” and choose /usr/lib/kicad/plugins/bom2csv.xsl file
- The “command line” field will automatically sett as xsltproc -o “%O.csv” “/usr/lib/kicad/plugins/bom2csv.xsl” “%I”
- Press “Generate”, KiCAD will create a .csv file with a list of components
Windows
Generating BOM files in a .CSV format is not directly possible in WIN. This problem can be solved using a following procedure:
- Download Saxon and install it
- In KiCAD eeschema open “Tools > Generate Bill Of Materials”
- Press “Add Plugin”
- Name it as you wish
- In a command line write a following path “C:\Saxonica\SaxonHE9.5N\bin\Transform.exe” -t ”%I“ -xsl:“C:\kicad\src\kicad\eeschema\plugins\bom2csv.xsl” -o:”%O.csv“
- In the first part, there is a path leading to the installed Saxon program, the second part leads to a bom2csv.xsl file (found in a folder with an installed KiCAD)
Generating production data
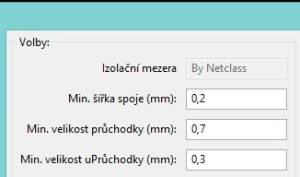
During designing, it is good not to undertake (?? Nepodlézat) parameters in a following table:

Before you begin generating production data, it is necessary to carry out a DRC control.
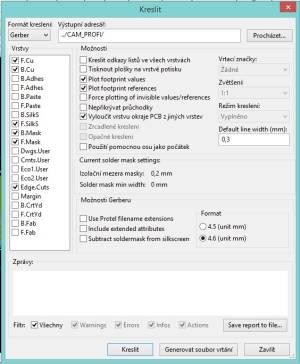
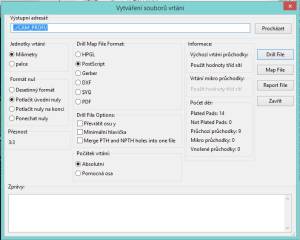
Recommended parameters:
Gerber data
Drill data
Mentor Graphics PADS Layout
It is a proprietary software where most of the present MLAB modules are designed. However, we assume that it will be completely replace by Open-Source KiCAD in the future.
PCB design
A use of layers
In case of fidu labels (?? fidu značek) and other similar objects (various holes etc.) it is helpful to turn off refdes - they are not needed on osazovák (??).
Filter = Labels, mark the text and delete it using Del key Deleted labels can be laid (?? Položit) again.
Texts (labels on printing) belong to Silkscreen Top/Bottom layer. Do not forget to place module identification somewhere. The same text also belongs to the traces layer (vrstva spojů ??).
Font 80mils Line 8mils
In case of diodes, we add A to the anode and in case of condensers we add + to the Assembly Drawing Top/Bottom layer.
Font 80mils Line 8mils
Design Rules a elements size
Settings in Setup / Design Rules / Default / Clerance determine the with of the traces and insulators spaces between various objects. Set the values with respect to the density of design.
Trace widths Trace Width / Minimum = 12mils (possibly up to 9mils) Trace Width / Recomended = (12mils), 15mils, 20mils, 30mils or 45mils Trace Width / Maximum = unlimited, however it is better to pour traces wider than 60mils with copper Insulatory distances Clearence = 10mils Clearence Copper = 20mils
Raster is suitable especially for components placement. For placing traces, raster can be in fact arbitrarily small. It can be easily set using G command, e.g. G10 directly from keyboard.
OrCAD Schematic
A tool for creating electrical circuits of modules and a following export of netlists into PADS system for processing PCB designs. The vast majority of module schematics is drawn using this editor. Because it is used in combination with PADS and it is no longer notably developed, it is assumed to be replaced by KiCAD in a near future.
Schematics drawing
Basic programme settings
Settings for an automatic stamp insertion Options /Design Template / Title Block
Library Name = C:\LIBRARY\ORCAD9x\SYMBOLS Title Block Name = TITLE_MLAB
Page size settings (European settings) Options / Design Template / Page Size
Units = Millimeters New Page Size = A4 Pin to Pin Spacing = 2.54
Raster settings Options / Design Template / Grid Reference
Vertical & Horizontal Width = 2.54
Allowed schematics’ font sizes are 8, 14 or 22.
Where to place libraries
During a schematics drawing, we save libraries into C:\LIBRARY\ORCAD9x directory, so that when there is a change in a library, all used library elements in the existing schematics can be updated with ease.
Every schematics’ element is saved together with its own schematics in the so called library cache - it is saved including a whole absolute path to the library it was copied from and at the same time, in case of update, it is also search for here. If all users have the same libraries at the same place, life would be easier :)
We have following groups of libraries:
- Libraries containing general schematics symbols (?? Značky), e.g. all kinds of different transistors. Such libraries serve as a depository of ‘structures’ during a creation of various components.
- Libraries containing a choice of a common representatives of certain groups, e.g. specific common transistors.
- Libraries containing a whole group of specific components, e.g. jumpers with different types of tips (?? Špička).
- Libraries containing components from a specific manufacturer. These are saved into subdirectories of specific manufacturers.
When working with libraries, one must be extra cautious not to delete some of their elements by change (it is enough to press DEL and the element is gone). It is beneficial to set the finished libraries as Read Only. Elements of libraries can be dragged into an library from a library cache of an existing schematics.
How to create a library
Generating outputs
Generating netlists
Netlist contains a list of connections in PCB design, values of components and names of their encasements. It can be generated via a Tools / Create Netlist option.
Other PCB Footprint / Combined Property String = {Device},{Value}@{PCB Footprint} Formatters = padspcb.dll Netlist File 1 – set a suffix .ASC Generating list of components
Creating a list of components consists of two steps
- Generating a list from a schematics
- Conversion into an XLS table
A list of components from OrCADS is generated using a Bill of Material function, resulting in a TXT file.
Header: Quantity\tReference\tPart\tPCB Footprint Combined property string: {Quantity}\t{Reference}\t{Value}\t{PCB Footprint}
The final form of components’ list is an XLS table. You can find an exemplar of table in VZOR_Seznam_součástí.xls. Save it into the SCH directory and open it. Proceed according to the instructions that are found in the exemplar. Generating .PDF
Printing usually uses A4 as its target format, even in case of schematics that are originally of A3 size. 600dpi resolution is sufficient for a good quality output.
File is named according to the name of the module with a _sch suffix - e.g. SAMPLE_sch.pdf.
Adobe Acrobat Distiller - preferred
Acrobat Distiller creates colourful PDF files. It does not need any specific parameter setting (600dpi, scale 100%).
When printing with OrCAD Capture, it is necessary to set up a reduction in scale of the print and its shift in order for borders to be satisfactory.
A3 schematics – Scale=0,65; Print Offset X=12, Y=10 A4 schematics – Scale=0,91; Print Offset X=12, Y=10 Adobe Acrobat Writter
Acrobat Writter create black and white PDFs. In order to get a small size of the final PDF files, a compression has to be set. Neither the output size nor the shift cannot be altered. Advantage of this program is, that the schematics can be printed at once even if it contains lists in various formats. The final format does not have to be A4, however it is the most common case. Different versions of the program have different settings’ possibilities.
Page Setup Page Size / Standard = A4 Graphic / Resolution = 600dpi Graphic / Scaling = 100% Compression Options General / Compress text and lineart = Yes Color/Gray Scale Images / Compress using = ZIP
Files cleanup
Delete all the unnecessary files, check the names of the final files and set Read Only attribute.
The following files are not routinely loaded (?? Zavést) to database:
- .OPJ project definitions
- .DBK backup schematics file (.DSN)
- .OBK backup library file (.OLB)
On the contrary, the following files do contain important data:
- .DSN schematics file (also contains library cache of the used elements of libraries)
- .OLB library file (common libraries, best when in C:\LIBRARY\ORCAD9x directory)
- .ASC netlist
- .PDF file with the printed schematics (name in the XXX_sch.pdf format)
- .XLS file with the components’ list, including ordering (??) objednacích information
Mandatory actions
The list of mandatory actions serves as a quick check that you have not forgotten anything important. All the question should be answered either “yes” or “in this case intentionally no”.
New schematics establishment:
- Is the right page format chosen (A4 or A3) ?
- Is there an information about the schematics history on the first page?
- Are the values of the components that will not be mounted marked by an underscore?
- Does the schematics contain also componontents that will not be mounted onte the PCB
- Are there at least 2 fidu marks (??) for each PCB side on every schematics?
Actualisations:
- Is the history on the first page up-to-date?
- Is the title block on every page up-to-date?
- Have you generated a valid netlist in .ASC format?
- Have you generated schematics print file in .PDF format?
- Is there a correct page order in the .PDF file?
- Have you generated a list of components?
- Are the files named correctly?
- Do the files have Read Only attribute set?
- Have you deleted any unnecessary files (and directories)?
Eagle
Some modules are designed in this system - however, due to a necessity of having different directory structure, they are published in SVN database MLAB_E that does not yet have web listings. In the future, we do not expect further using Eagle for module design.
Texts and labels
Eagle software uses different text fonts that a formerly used PADs, that is why its setting is slightly different. So far, the following setting seems to work best:
- Copper layer = labels font “Vector”, Size 80, Ratio 10%.
One module can contain more font sizes (usually less than 3 is enough). They are used in the following order: module name, labels, warnings, author identification. Different font sizes are of course only used in cases, when there is enough space on the module. Therefore, some modules only contain one font size, with respect to a good readability and module size.
Mechanical CADs
LibreCAD
To draw flat technical drawings LibreCAD can be used. In Ubuntu, it can be installed directly from the package (?? Z balíku):
sudo apt-get install librecad
FreeCAD
FreeCAD is on the other hand well suited for a classical 3D modelling, known from many proprietary CAD software. It seems convenient to use its daily build, available from PPA.
sudo add-apt-repository ppa:freecad-maintainers/freecad-daily
sudo apt-get update
sudo apt-get dist-upgrade
sudo apt-get install freecad-daily freecad-daily-doc
OpenSCAD
OpenSCAD is a tool for designing 3D models of technical devices. In contrast with most of the design tools, OpenSCAD uses a programming language to describe objects. This approach allows models parametrisation and their easy versioning with an accurate identification of changes. A basic introduction into its using can be found here Know only 10 things to be dangerous in OpenSCAD. There is also an overview of basic functions.
Ubuntu Installation
In order to instal the actual version for Ubuntu 14.10 and higher, there is a PPA repository ready:
sudo add-apt-repository ppa:openscad/releases
sudo apt-get update
Openscad can be then installed using a following command:
sudo apt-get install openscad
The programme can be opened in the usual from dashboard or using command line.
For the newest functions to be available use the daily Openscad compilation:
sudo apt-get install openscad-nightly
It can be run from the command line like openscad-nightly, both versions can be installed in parallel.
To display the STL generated views in Nautilus, you can use stl-thumbnailer tool.
Coding style
It is practical to follow some basic coding style rules when creating models in opens cad.
- Use international language for the names of variables (English, using globally known expressions and abbreviations)
- Do not shorten the names of variables too much
- Separate the variables and operators by spaces
- Use 4 space indentation (tabulator) in a nested code block
Using SublimeText editor
The editor integrated directly into OpenSCAD is not very comfortable for use. Therefore we prefer to edit the source codes of models in SublimeText 3 editor - you can install a plugin that recognises the OpenSCAD language.
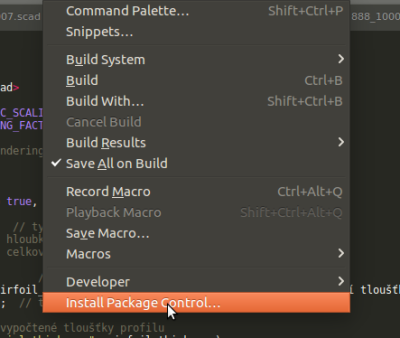
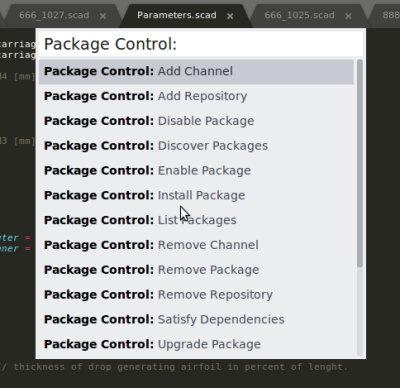
The installation can be done through a system of packages that can be activated via Tools → Install Package Control...
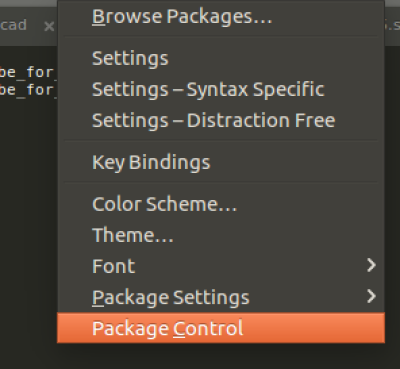
Open the package control tool with Preferences → Package Control option.
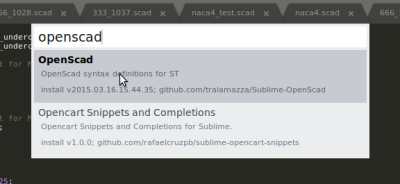
In the menu choose “Install Package”
Write “openscad” into a filter field and click the proper package.
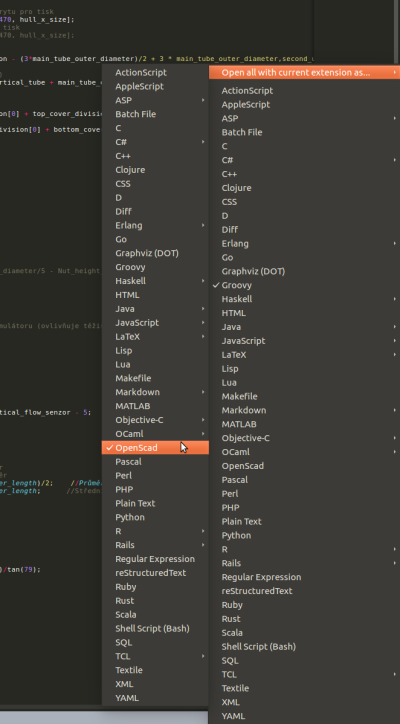
Now it is necessary to close and re-open the SublimeText so that the new configuration will be set. Then it is possible change the setting so that all files with .scad suffix will be opened with OpenSCAD syntax highlighting. This setting can be done via an option found in lower right corner and choosing Open all with current extension as.. → OpenScad
During the following opening of any .scad file, it will be automatically recognised as a OpenSCAD source file.
Generating and viewing production data
Data gerber
Merging the gerber data
In order to merge your data, you can use gerbmerge software - there are several different development branches on the Internet. When you want to use it with kicad software, it is convenient to use a relatively new development branch prof. Karl-heinz Kunzelmann. It is base on the first version 1.8 and other adjustements. It differs significantly from a gerbmerge3 version, which on the other hand has a cleaner source code.
First, we install dependencies.
sudo apt-get install python-simpleparse python-simpleparse-mxtexttools
Next, we download gerbmerge from GitHub.
git clone https://github.com/MLAB-project/gerbmerge
cd gerbmerge
sudo python setup.py install
For gerbmerge software to function properly, it has to have a set way of paneling (způsob panelizace). This is done via a configuration file - an example of such file can be found in programme source code (it also contains commentaries explaining its usage). If we have a prepared configuration file, e.g. layout-mm-3.3.cfg, we can run the gerbmerge.
kaklik@popelnice:~/git/gerbmerge/testdata-with-KiCAD-using-metric-units/MLAB_panel$ ../../src/gerbmerge/gerbmerge.py layout-mm-3.3.cfg
The programme will try to find an optimal motives’ layout on panel according to a chosen configuration and it will generate merged files.
An example for merging SET10A (the installation is the same as the previous example). First, it is necessary to get to the place with the set data:
MLAB@MLAB:~/MLAB-project/gerbmerge/MLAB_panel/SET10A$
Setting of set merging is found in the layout.cfg file and the placement.merge.txt file contains the requested set layout. A file with set layout will be generated automatically during the first startup of grebmerge programme.
Generating such prepared data can be done using a following command:
../../src/gerbmerge/gerbmerge.py --place-file=placement.merge.txt layout.cfg
GerberTools
GerberTools is so far untried open-source tool written primarily for Windows in C#.
Gcodes for 3D print
Technological data for 3D printing are in MLAB generating using Slic3r software. So far, there are not any ready-made usable packages. Therefore it is necessary to translate the programme directly from the source codes found on GitHub.
Slic3r Installation
sudo apt-get install libextutils-cppguess-perl freeglut3-dev
Compilation
Currently, a Github’s master branch is used - it is a compromise between stability and the software’s possibilities. The compilation itself is done mostly according to instructions from README.md file.
Programming tools
Most of the software programming in MLAB uses Python or C. Development tools for these languages are generally well known. Furthermore, most of the development is aimed at Linux. That is why we only provide a list of tools that we use.
Programming GUI
A programming environment where the source code is created. The most favourite among users are the following two option - however, the source code can be written in any text editor.
Light Table
Light Table is a code editor that excels at some special features, such as interactive running of sections of source code or direct search in documentation. Its installation can be done by downloading a compiled package from Light Table Download, unpacking it and running the following commands that will move it to system folders.
sudo mv LightTable /opt/LightTable
sudo ln -s /opt/LightTable/LightTable /usr/bin/lighttable
Sublime text
A Multiplatform paid editor for linux, Window and Mac OS. Some of its special features include an overview of the whole source code. Free version is sufficient for ordinary use.
Ubuntu installation
sudo add-apt-repository ppa:webupd8team/sublime-text-3
sudo apt-get update
sudo apt-get install sublime-text-installer
Code::Blocks
A widely used editor. It’s advantage is that it runs under various platforms and thus can be used by Windows users as well.
sudo apt-get install codeblocks
Embeded systems
Tools used for programming individual types of microcontrollers are mostly described in sections related to programming under different architectures.
PIC
ARM
AVR
Version Control
GitHub
github is used for management of software development and modules’ documentation.
Linux
The most effective user interface for git seems to be the command line - here its efficiency is even more striking than in SVN.
New user
For a comfortable work with git it is effective to use a method of cloning with SSH - then there is no need for permanent logging in during work. Communication is authenticated base on a privet key. Every computer needs to have a unique one generated.
- You need to create a user account on https://github.com/
- Next, you have to generate an SSH key for the specific computer.
- The generated key has to be added into your github account
- If the addition of the key into clipboard (?? Schránka) does not work properly, it is possible to obtain the key via opening a hidden file and then copying the key manually. ‘’cat ~/.ssh/id_rsa.pub''
- This procedure only has to be done during the first download to a given computer.
Basic commands
Cloning a repository :
- First, you have to choose a place on your computer, where the repository will be saved and at that place, open the command line
- As an example, we will use kicad-mlab repository: https://github.com/MLAB-project/kicad-mlab
- From the page, download the path to the repository - web button “Clone or download”.
- It is necessary to switch the path to “Clone with SSH” in stead of “Clone with HTTPS”.
- In our case, the path is as follows: git@github.com:MLAB-project/kicad-mlab.git
- Run the following command in the command line:
git clone git@github.com:MLAB-project/kicad-mlab.git
- You may be asked to provide a password you have chosen during the SSH key generation
Downloading the current version
- In the folder (?? Na místě) with the saved repository, run the following command in the command line:
git pull
Finding out whether the repository is up-to-date
git status
This command lists all the files that have been changed or added as new.
Adding new file or folder
git add file_name
After marking (?? Označit) the whole path from the command list of commands (?? výpis příkazů), the path can be inserted by clicking on the middle mouse button. For submitting (?? Adding, přidání) all the changes, you can use ```git add .```.
Creating a commit
git commit -m “Description of the change"
After running the above-mentioned command, the commit is only in the local copy of the repository. For data to be sent to the server, see the next section.
Upload to server
git push
It is helpful to list the output of the following command, to see if all the operation were done correctly.
git status
The list should not contain any items that we wanted to upload.
Changing the size of the local repository
In its default setting, Git downloads the whole repository including all the edit history. This can be prevented during the repository download by including ```–depth=<pocet stazenych commitu>``` parameter.
git clone <adresa_repozitare> --depth=1
If you want to apply it onto an existing copy of the repository, you can use the following approach:
git fetch --depth 2
git reflog expire --expire=all --all
git gc --prune=all
Windows
TortoiseGit Under Windows OS, data from GitHub can be comfortably download via a TortoiseGit programme.
Documentation
Text documentation
All MLAB text documents are UTF-8 coded. Some users however use Windows for editing files which may result in an incompatible file, which needs to be re-coded.
Converting the coding of text files.
iconv -f WINDOWS-1250 -t UTF-8 zprava.txt -o zprava.txt
Dokuwiki
Dokuwiki is a system that runs the documentation.
Offline editing
Documentation can be edited offline, which is a very useful feature that one can use e.g. during traveling.
K tomu je potřeba si na svém notebooku zprovoznit lokální instanci wiki. Tu si zprovozníme podle návodu na instalaci Dokuwiki pod Ubuntu. Data pak mezi oběma instancemi wiki synchronizujeme pomocí pluginu sync, který naistalujeme na svojí lokální instanci wiki. Po první synchronizaci se serverovou wiki můžeme stránky lokálně offline editovat a změny následně nahrát na veřejnou wiki MLAB.
LaTeX
LaTeX je je systém pro sazbu profesionálních dokumentů. V složce templates je pro něj šablona.
V případě psaní dokumentace v Ubuntu se použivají následující balíky
sudo apt-get install texmaker texlive-lang-czechslovak
Po jejich istalaci je možné psát a editovat MLAB dokumenty napsané v LaTeXu
Dokuwiki a Latex
Poslední dobou je poměrně častým dokumentačním problémem převod dokumentace postupně vznikající na wiki do formální podoby dokumentu. Přímé přepisování není příliš efektivní. Proto je vhodnější využít programové nástroje jako například Pandoc, ten umí vzájemně převádět mnoho formátů dokumentů. Ale neumí přímý převod Dokuwiki syntaxe na Latex. Lze si však pomoci použitím HTML kódu, který generuje dokuwiki a se kterým již Pandoc umí pracovat.
Webová verze Pandoc umí zpracovat HTML kód o délce pouze do 1000 znaků. Je proto vhodné si nainstalovat lokální offline verzi.
sudo apt-get install pandoc
Převod pak můžeme realizovat příkazem:
pandoc -f html -s -t latex temp_doc.html
Převedený dokument se nám pak vypíše do příkazové řádky, odkud jej pak stačí zkopírovat do Latexového editoru.
Obrázková dokumentace
Dia
Program dia slouží na tvorbu diagramů a blokových schémat.
Fritzing
Je snaha použít fritzing pro tvorbu dokumentace zapojení jednotlivých modulů v konstrukcích. Zatím však Fritzing nepodporuje mechanické umístění. Plošných spojů. Takže se tento nástroj reálně nepoužívá.
Prezi
Je nástroj na tvorbu veřejných prezentací projektů.
ImageMagick
Kontrola kvality
Pro zkontrolování celkové kvality dokumentace návrhů slouží přehled dokumentace modulů.
Tento přehled lze řadit podle různých kriterií. Například
- https://www.mlab.cz/modules/all?order=status,name - řazení podle stavu a jména
- https://www.mlab.cz/modules/all?order=id - podle id (výchozí)
- https://www.mlab.cz/modules/all?order=root - podle složky (tedy kategorií)
Každý modul má přiřazenou známku kvality. Aktuálně se hodnotí kvalita fotografie podle následujících kritérií
- 0 - žádná fotografie
- 25 - render z KiCAD
- 50 - nekvalitní fotografie např. z telefonu
- 100 - profesionální fotografie z fotografického boxu.
Organizace vývoje
Redmine
Je nástroj pro vytváření úkolů a dělbu práce na projektech. Jeho instanceběží na serveru.
Nástroje pro zpracování dat
Interaktivní výpočetní nástroje
Jupyter notebook
Jupyter je softwarový nástroj, který umožňuje použít více výpočetních a programátorských balíků jako je například Python nebo Octave. Výhodou Jupyteru je interaktivní zpracování příkazů což oceníme hlavně při testování nebo psaní nových algoritmů.
Instalace
Postupujeme podle doporučení v repozitáři se zdrojovými kódy.
sudo pip install notebook
Spuštění se naopak provede
jupyter notebook
Kde si pak zvolíme námi použitý kernel.
gnuradio
Gnuradio je nástroj pro zpracování signálových dat obvykle z SDR přijímačů.
Simulační nástroje
Nec2++
Necpp je nástroje pro numerické výpočty anténních parametrů.
QAntenna
Kompilace
sudo apt-get install qtbase5-dev qttools5-dev
 git clone git://git.code.sf.net/p/qantenna/code qantenna-code  qttools5-dev-tools
 cd qantenna-code/
 qmake qantenna.pro
 make


